

 Elizabeth McCarten's Ravelry Downloads


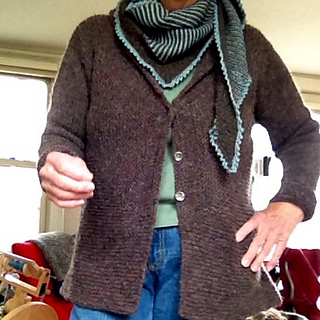


Harriet's Jacket
During the week between Christmas, 2012 and New Year’s Day, 2013, I spent my spare time viewing the 1987 three-part Lord Peter Wimsey TV mystery series. In the middle episode, “Have His Carcass”, Harriet Vane wears an astonishingly beautiful collection of handknits while she roams the lonely northern coast of Britain. My jacket was designed with her tweedy, romantic style in mind. Although it in no way resembles any of the actual garments worn by her character, it looks as though it would be at home in the same setting.
The construction is based on an idea sparked by Carol Anderson’s “Babies and Bears for Grownups” jacket, a design which I loved making, but which never quite worked for me in terms of fit or style. I’ve taken the same basic concept, starting at the cuffs and knitting toward the centre, but I’ve made the arms slimmer, changed the neckline to a flattering V-neck with a graceful shawl collar, and added shape to the body by knitting down after the centre-back join to create a short peplum. Great fun to knit; just as much fun to wear!
Yardage required: 912 (1064, 1216, 1368, 1520, 1672).
These notes are for a deeper shawl collar than the one in the original Buttonbox Waistcoat from Knitty, Spring 2013, but can be adapted to Harriet’s Jacket.
- Using a needle one size smaller needle than that used for the body), and starting at the bottom of the right front, pick up sts along the right front band, around the collar, and down the left front band. Do so using the same ratios I presented earlier:
- for vertical sections (front bands and the upper V-neck), pick up 3 sts for every 4 rows,
- for diagonal bits (the V-neck and the short slopes on either side of the back neck) pick up one st for every row,
- in the tiny gaps between the back neck slopes and the centre back neck, work M1s into the horizontal strand in the gap; make the M1s lean toward the centre back neck, i.e. M1L on the right hand side, and M1R on the left hand side.
-
Knit one row. Insert locking st markers where you want your buttonholes to be. The top one should be 3 stitches below the V-neck, and I like the bottom one to be about an inch from the bottom. Space the others accordingly. Place them BETWEEN the two stitches where you want each buttonhole to go. Use locking stitch markers of a different colour to mark where the V-neck begins and ends.
-
Buttonhole row AND beginning of short rows for collar(RS): Knit to 2 sts before buttonhole marker, k2tog, YO, k2tog, rep from until last buttonhole is completed, knit around collar to 2 sts before left side V-neck marker (the second one), SWR (see below), turn.
-
(WS row): Knit to 2 sts before right side V-neck marker, SWR, turn.
-
Knit to 4 sts before left side V-neck marker, SWR, turn.
-
Knit to 4 sts before right side V-neck marker, SWR, turn.
-
Knit to 6 sts before left side V-neck marker, SWR, turn.
-
Knit to 6 sts before right side V-neck marker, SWR, turn.
Cont to work pairs of short rows, working the wraps 2 sts apart until there are 22 wraps on ea side in total (total desired number of garter st ridges minus 3).
AT SAME TIME, after about half the total desired number of ridges counted from the RS of the back, inc approx 3” worth of sts by the kfb method in the centre back between the shoulders. The increase row must be worked on the side that will become the RS when the collar is flipped over into its position when worn.
After the last SWR and turn, knit to end, ignoring wraps, i.e. don’t bother to neaten them (see note below).
Next Row (WS): Knit to end, ignoring wraps, and working (k1, p1) into each YO to complete the buttonholes.
Last Row: Knit.
BO knitwise from the WS., using a 4 mm dpn in your right hand for the front borders (which should be worked rather When casting off, work the last 2 sts tog for a neat corner.
12948 projects
stashed 8505 times
310 projects
stashed 250 times
9043 projects
stashed 4920 times


