patterns >  Kirsten Holloway Designs and 1 more...
> Easy Chunky Double Seed Stitch Crochet Hat


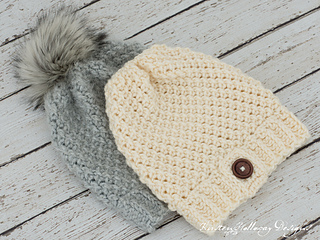
Easy Chunky Double Seed Stitch Crochet Hat
A free version is also available.
This crochet pattern is available for FREE on my website, (visit pattern website link above), or you can download it here on Ravelry as a printable, ad-free PDF.
This is a crochet pattern. The results of the stitch give a look that is similar to the knitted “double seed stitch” which is why it has this name.
Difficulty:
Easy
Materials Needed:
5.5mm (I) hook, or hook needed to obtain gauge – band
6.5mm (K) hook, or hook needed to obtain gauge – hat body
150 yards #5 chunky weight Red Heart Soft Essentials in “Cream”, or Red Heart Hygge in “Cloud”
Yarn needle
Scissors
1” wooden button
(Optional materials if you want to make a pom-pom) :
1/4 yd Fashion Faux Fox Fur Fabric -Silver
Heavy-duty button thread
Sharp, heavy duty sewing needle
Golf-ball sized piece of polyester stuffing
Stitches Used:
sl st = slip stitch
ch = chain
sc = single crochet
FPdc = front post double crochet
Additional Terms:
hdc in the 3rd loop = Look at the top of the stitch, and locate the sideways “V”, bend the stitch to look at the back, and you should see another “V”. You’ll be working into the back loop of that “V”, this is called the 3rd loop.For this hat band the textured portion created by working hdc in the 3rd loop should always be facing you when beginning a new row.
Gauge:
Hat body: 12 sc, FPdc sts in 4”
Hat band: 7 hdc sts in 2”
Measurements:
Finished adult hat measures 10” tall by 10” wide.
Additional Notes:
-Ch-1 at beginning of round does not count as a stitch.
-If you do not know how to work a Front Post double crochet stitch here are some written instructions that may help: Instead of putting your hook through the sideways V at the top of the stitch, wrap your hook around behind the post (body) of the stitch and draw up a loop, complete the stitch as you would a regular double crochet.
-This hat comes out slightly slouchy. If you prefer you can make a beanie by stopping after about 8” of height instead of 10 as the pattern mentions.
2711 projects
stashed
1952 times
2648 projects
stashed
2064 times
- First published: December 2019
- Page created: December 3, 2019
- Last updated: October 28, 2025 …
- visits in the last 24 hours
- visitors right now


