


Luckyslips: Stretchy Crochet Mitts
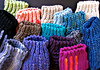
Luckyslip is a delightfully snug and stretchy texting mitt that is quick to crochet and easy to customize in two sizes (for luckymen and luckywomen). It satisfies my primary requirement for fingerless mitts: a comfortably snug fit at the finger opening and a stretchy cuff. I thought maybe I was just picky, but others who have tried them on mention the same features.
The Luckyslip pattern also reviews some key points from my Introduction to Slip Stitch Crochet classes. I developed the original mitt (in blue) to contrast four basic uses of a back-loop slip stitch.
My goal was a no-fuss fast project that students could build onto the practice swatch they created in class, and wear during the rest of a crochet conference that had icy air conditioning (and show off their slip stitch skills such as fitted ribbing, ribbed seaming, short row shaping, and the special appeal of “Bosnian” slip stitching).
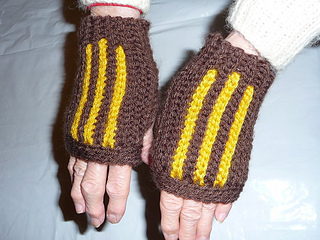
This Luckyslip edition preserves the original advantages of the class project, including the gradual progression of skills as each step of the first mitt is completed. I’ve added a men’s size, a luckystriped version in two sizes, and a full range of customizing options.
Skill Level: Easy Intermediate. The slip stitch is an elementary stitch, however, the basic shaping method that is used for the cuff is considered an Intermediate skill. Crocheting slip stitches with a consistently looser gauge, as determined by the crochet hook size, is also challenging for the average crocheter. It’s an important skill for making mitts that fit. I call this skill a “hook-led” gauge, and it opens up a whole world of exciting possibilities with slip stitch fabrics.
After using this pattern you will know (if you didn’t already):
- How to crochet slip stitch ribbing for stretchy fingerless gloves.
- How to begin and end ribbed rows, and how to count them accurately.
- How to determine the front and back of this reversible ribbing.
- How to use the foundation row, seaming row, and turning chains in slip stitch crochet.
- How to shape slip stitch ribbing into a fitted cuff that retains its stretch.
- How to adjust both width and length of this type of fingerless glove.
- How simple color changes work for striped slip stitch ribbing.
- How to edge the ribbing with a Bosnian slip stitch and why.
- How to fasten off slip stitch rounds more smoothly than with a slip stitch join.
The women’s Luckyslip Mitt size is designed to have trim dimensions for a quick project, however, it’s easy to customize everything about this design once you’ve made a quickie. Your first mitt will come in “handy” as a template for your own variations. Look for the italicized Customizing Tips within the pattern for changing the length from cuff to finger opening, placement of thumb opening, and width across palm.
Sizes are given for a luckywomen’s size with changes for the luckymen’s size in parentheses:
Length of mitt from cuff to finger opening: 6.25 (8)“ {15.75 (20.25) cm}
Circumference of inside palm of mitt, unstretched: 6 (6.75)” {15.25 (17.25) cm}; almost doubles when stretched.
Circumference of inside finger opening, unstretched: 5.25 (6)“ {13.5 (15.25) cm}; stretches to approximately 7 (8)” {17.75 (20.25) cm}
Circumference of inside wrist cuff opening, unstretched: 5” {12.75 cm}; almost doubles when stretched.
Circumference of thumb opening: 3.25” {8.25 cm}
Distance from thumb opening to top (finger opening) of mitt: 1.5 (2)“ {3.75 (5.0) cm}
Distance from thumb opening to cuff of mitt: 3 (4)” {7.5 (10.0) cm}
Figure on each basic luckywomen’s mitt taking 20g of yarn at most, so a 50g ball would be enough for one pair. You might get five complete pairs from 200g of yarn.
Figure on each basic luckymen’s mitt taking 44g of yarn at most, so a 100g ball would be enough for one pair. You’d get four complete pairs from 200g of yarn.
Substituting a yarn: The best yarns for this project are wool or acrylic blends because they add squishy stretch. Choose a bouncy #4 medium-weight yarn.
Recommended: 3 stitch markers (until you can recognize the last slip stitch of each row).
Yarn needle for weaving in ends.
I have used a minimal amount of abbreviations in this pattern. UK and Australian equivalents for American measurements, yarn weights, and stitch terms are in brackets { }.
6810 projects
stashed 5385 times
201836 projects
stashed 111395 times
104283 projects
stashed 79432 times
11725 projects
stashed 6485 times
162601 projects
stashed 60314 times
1238 projects
stashed 1118 times
799 projects
stashed 899 times
124 projects
stashed 123 times
54720 projects
stashed 43644 times
42 projects
stashed 56 times
8 projects
stashed 8 times


