patterns >  Pascuali Collezioni on Ravelry
> Milano Sweater


Milano Sweater
DE
Zunächst wird der obere Streifen des Rückens kraus rechts
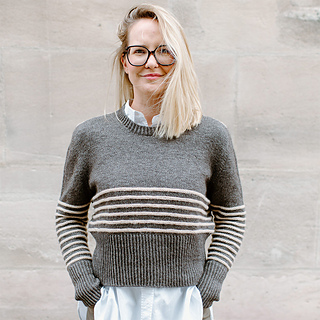
gestrickt. Aus diesem Farbstreifen wird weiter der Rücken mit verkürzten Reihen in Farbe A geformt. Im Anschluss werden nacheinander die beiden Vorderteile mit verkürzten Reihen geformt. Aus den Kanten des Farbstreifens werden zusätzliche Maschen aufgenommen und alle Maschen auf eine Nadel gebracht. Während in Reihen gestrickt wird, formst du den Halsausschnitt. Für die Kragenmitte werden neue Maschen angeschlagen und die Arbeit zur Runde geschlossen. Ab jetzt werden in der Passe Zunahmen für die Arme gestrickt. Danach werden die Zunahmen am Arm und im Rumpf gestrickt. Wurden alle Zunahmen gearbeitet, werden die Arme vom Rumpf getrennt. Der Rumpf und die Arme werden nacheinander mit der Streifenfolge anschließend im Bündchenmuster gestrickt. Ganz zum Schluss wird der Kragen angestrickt.
Größen
Die Größen entsprechen folgendermaßen dem Brustumfang:
5XS (4XS) 3XS (2XS) XS (S) M (L) XL (2XL) 3XL (4XL) 5XL:
ca. 81 (87) 90 (96) 100 (106) 111 (115) 127 (136) 146 (153) 167 cm
Die Länge beträgt:
5XS (4XS) 3XS (2XS) XS (S) M (L) XL (2XL) 3XL (4XL) 5XL:
52 (53) 54 (55) 56 (56) 57 (57) 58 (59) 60 (61) 62 cm
Du brauchst:
Pascuali Sayama (50 % Schurwolle, 50 % Baby-Lama)
Lauflänge 50 g ~ 112 m:
5 (5) 6 (6) 7 (7) 8 (8) 9 (10) 11 (12) 13 x 50 g Stränge in Farbe A #307 Creme
1 (1) 1 (1) 1 (2) 2 (2) 2 (2) 2 (2) 2 x 50 g Stränge in Farbe B #311 Anthrazit
Stricknadel ø 4,0 mm (80 - 100 cm)
Nadelspiel ø 4,0 mm (40 - 80 cm) (entfällt, wenn mit der Magic Loop Methode gearbeitet wird)
Maschenmarkierer (MM, nummeriert)
Maßband, Wollnadel, Schere, Maschenkordeln
EN
You begin the Milano sweater by working a garter stitch stripe across the upper back. Starting from this colored stripe, the back is then continued with short-row shaping worked in Color A. Then the two front sections are worked one at a time, incorporating short-row shaping. Additional stitches are picked up from the edges of the colored stripe, and all the stitches are then placed on one needle. As you work in rows, you also shape the neck opening. You cast on new stitches for the center of the neck opening and join the sections to work in the round. From this point on, you work increases for the sleeves, followed by increases in the sleeves and torso. Once all the increases are worked, the sleeves are separated from the body. The torso and sleeves are then worked separately, adding a stripe sequence and the ribbing. The collar is added at the very end.
Sizes
The sizes correspond to the bust measurement as follows:
5XS (4XS) 3XS (2XS) XS (S) M (L) XL (2XL) 3XL (4XL) 5XL:
approx. 32 (34.2) 35.4 (37.8) 39.4 (41.7) 43.7 (45.3) 50 (53.5) 57.5 (60.2) 65.7“
The lengths are as follows :
5XS (4XS) 3XS (2XS) XS (S) M (L) XL (2XL) 3XL (4XL) 5XL:
20.5 (20.9) 21.3 (21.7) 22 (22) 22.4 (22.4) 22.8 (23.2) 23.6 (24) 24.4“
You need:
Pascuali Sayama (50 % virgin wool, 50 % llama wool)
Yardage 1.76 oz ~ 122 yds (50 g ~ 112 m):
5 (5) 6 (6) 7 (7) 8 (8) 9 (10) 11 (12) 13 x 50 g skeins in color A #307 Creme
1 (1) 1 (1) 1 (2) 2 (2) 2 (2) 2 (2) 2 x 50 g skeins in color B #311 Anthracite
US 6 (4 mm) circular needle, 30–40“ (80–100 cm) long
US 6 (4 mm) DPNs (not necessary if using the Magic Loop method)
Stitch markers (mm), numbered
Measuring tape
Tapestry needle and scissors
Stitch cords or wire
517 projects
stashed
339 times
- First published: November 2024
- Page created: November 3, 2024
- Last updated: November 8, 2024 …
- visits in the last 24 hours
- visitors right now


