patterns >  Stefanie Bold Design
> Perpendicular Hat


Perpendicular Hat
#perpendicularhat #stefaniebolddesign
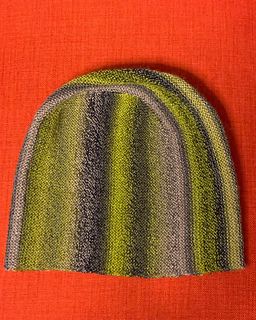
This slouchy hat is my second pattern that is inspired by hoodies. If you look at sewing patterns, a hood consists of two side panels connected by a rectangle. Just like the first pattern, this hat is worked completely in rows without purling. In this version, you work the first side panel from front to back. After picking up stitches, you work the center panel perpendicular to the first panel. Finally, you work the second side panel back to front, perpendicular to the center panel, using short rows and joining as you go to avoid seaming. The final touch is done by grafting about 8cm and you are done!
Note to sample hat: for the sample I used two solid yarns, changing colors every 4 rows. This is not mentioned in the instructions. Go ahead and make your personal version!
This pattern is available in english and german. You wil get two files and the english version is marked with “english”.
For chatter, pattern help and news, you can visit the Stefanie Bold Designs group.
Diese Mütze mit Überlänge ist meine zweite Anleitung die durch die Konstruktionsweise von Kapuzen inspiriert ist. Wenn man sich Schnittmuster von Kapuzen betrachtet, dann bestehen diese aus zwei gekurvten Seitenteilen die mit einem Rechteck verbunden werden. Wie die erste Anleitung wird auch diese Mütze komplett in Reihen gestrickt ohne linke Maschen. Hier wird jedoch zuerst ein Seitenteil von vorne nach hinten gestickt. Dann werden an der oberen Kante Maschen aufgenommen und quer dazu (im englischen „perpendicular“) der Mittelteil gestrickt. Dann wird das zweite Seitenteil wieder in Reihen gestrickt, diesmal von hinten nach vorne. Dabei wird es direkt mit dem Mittelteil verbunden. Abschließend erfolgt eine „Naht“ von etwa 8 cm im Maschenstich.
Hinweis zur abgebildeten Mütze: hier habe ich zwei Unifarben verwendet und nach 4 Reihen die Farbe gewechselt. Dies wird in der Anleitung nicht erwähnt. Die Anleitung bietet eine „weiße Leinwand“ auf der du dich austoben kannst!
Die Anleitung ist auf deutsch und englisch erhältlich. Du erhälst zwei Dateien und die deutsche Version ist mit “deutsch” gekennzeichnet.
Für Hilfe beim Nacharbeiten, Quatschen und Neuigkeiten kannst du gerne in der Gruppe Stefanie Bold Designs vorbeischauen.
- First published: March 2017
- Page created: March 18, 2017
- Last updated: June 15, 2023 …
- visits in the last 24 hours
- visitors right now


